Image Source : get.pxhere.com
Photography retouching is an essential part of the creative process of creating stunning images. It involves enhancing the tones, colors, and overall look of an image, resulting in a professional and polished finished product. With the help of modern photo editing software, it’s now easier than ever to make adjustments to photos and bring out the best in each image. From exposure correction and sharpening to cropping and color adjustment, there are a variety of Photography Retouching techniques that can bring out the best in your images. With the right tools, you can create amazing photographs that will stand out from the crowd.
Here are five of the most popular Photography Retouching techniques:
Load Luminosity as a Selection
Once you’ve loaded the luminosity selection, you can adjust brightness, contrast and color to enhance your image. In the menu bar, select Image > Adjustments > Brightness/Contrast. This will open a dialog box where you can easily adjust the levels of brightness, contrast and color that you want to apply to your image. Once you have set these to your desired levels, click on ‘OK’ to apply them. You can also use the Color Balance to adjust the different hues in your image. Just select Image > Adjustments > Color Balance and choose which ones you want to adjust. With these adjustments, you will be able to enhance the quality of your images and make them look more vibrant and eye-catching.
Clarity Adjustment
Once you have adjusted the brightness and contrast of your image, it’s time to move on to clarity adjustment. Clarity is a local contrast increase that focuses on the mid-tones of the image. It differs from sharpness because whereas increasing sharpness increases the contrast between edges, clarity increases the contrast between details in the image. To get the most out of your clarity adjustment, try using the Camera Raw Filter. Simply right-click your image and select the filter from the menu. From here, you can adjust the curve in the Point Curve and pull it down, giving a boost to the mid-tones and brightening up your image. To add more drama to your image, try adding a layer of Clarity Mask before applying the filter.
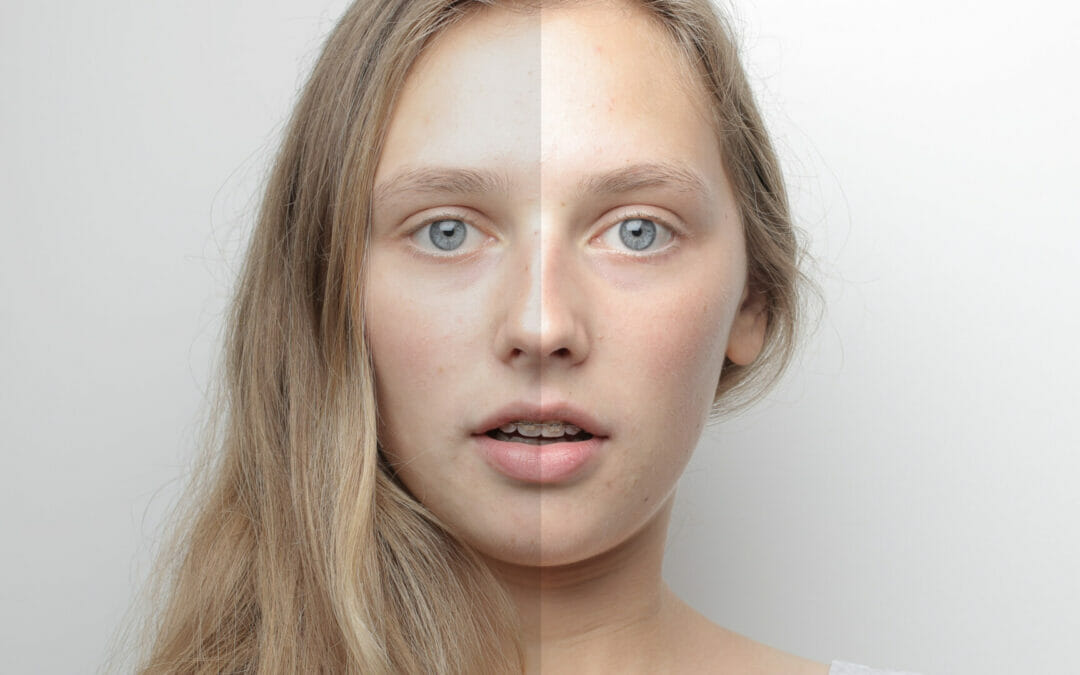
Color Restoration
Another popular Photography Retouching technique is color restoration. Color restoration is used to fix colors that have been lost in the digital process. This can be due to compression, exposure or noise. To start color restoration, select Image > Adjustments > Hue/Saturation. This will open up a dialog box where you can choose the colors that you want to restore. You can also use the ‘ eyedropper tool’ to select specific colors and use the slider buttons to adjust their levels. Once you have adjusted the hue and saturation of your desired colors, just click on ‘OK’ to apply them.
Shared Decay
Shared decay is a type of noise reduction that helps reduce grainy images by working on neighboring pixels in order to smooth out any jagged edges. To start shared decay, select Image > Adjustments > Noise Reduction. This will open up a dialog box where you can choose the level of noise reduction that you want to apply to your image. Once you have set the level, just click on ‘OK’ to apply it. You can also use the slider buttons to adjust the amount of noise reduction that is applied to your image.
Erosion & Defocus
The final photo retouching technique is erosion and defocus. Erosion and defocus are used to remove any unwanted elements from your image, such as stray hairs, dust or scratches. To start erosion and defocus, select Image > Adjustments > Defringe. This will open up a dialog box where you can choose the level of defringe that you want to apply to your image. You can also use the slider buttons to adjust the amount of defringe that is applied to your image. Once you have set the level, just click on ‘OK’ to apply it.
Color Adjustments
Color adjustments are one of the most important techniques when it comes to Photography Retouching. To ensure that you get the right color in your image, you can use gray cards, desaturate the shadows, and adjust the vibrance. Gray cards can be used to determine the correct exposure and white balance in your photos, while desaturating shadows can help reduce the contrast between dark and light areas in your image. Lastly, adjusting vibrance can give your photograph more contrast and make it look more vibrant. By making these small color adjustments, you can make a huge difference to the overall look of your photo.
Sharpening Your Images
Sharpening your images can make a huge difference in the final quality of your photos. It helps to bring out texture, contrast, and other details that can be lost when you take a shot. To sharpen your images, you can use the Unsharp Mask filter in Photoshop. This filter increases the contrast at the edges of the image and can be customized to your needs. Simply open your image in Photoshop, go to the filter menu and select Camera Raw, then enter an amount value between 100% and 200%, depending on how much you want to sharpen your image, and drop the radius to 0.1. You can also use the Overlay or Soft Light blend modes for further sharpening.
Cropping the Image
Cropping the image is an easy way to remove distracting backgrounds and remove clutter from the photo. To achieve the best results, it is recommended to follow the rule of thirds when cropping. This technique divides your photo into nine equal parts, and you should try to place the main subject of your image along one of the lines or intersections. There are plenty of photo editing tools available to help you easily crop images and make sure your photos look their best.
Exposure Correction
Exposure correction is one of the most important aspects of photo editing, as it can make a huge difference in how your final image looks. It’s also essential to get the right exposure levels for your photos as they are taken. To do this, you can use the histogram and adjust the exposure levels in either manual or automatic mode. With manual mode, you’ll need to adjust the aperture, shutter speed, and ISO settings to get the correct exposures. With automatic mode, the camera will adjust the settings based on what it detects from the scene. Once you’ve set up the correct exposures, you can then use photo editing software to enhance your images.
Using the Right Photo Editing Tool
Sharpening your images is a great way to add detail and make them look more professional, but it’s important to use the right photo editing tool to get the job done. Adobe Photoshop is the go-to choice for professional photographers, as it offers a wide range of features and tools for editing photos. It’s often where Adobe puts its latest state-of-the-art features first, including the new Exposure adjustment, which allows you to adjust the overall brightness or darkness of an image. Additionally, Photoshop provides tools such as Spot Healing, Frequency Adjustment, and Color Correction to help you make your photos look perfect. However, you don’t need to be a graphic designer or have Photoshop installed on your computer to make great-looking images – there are plenty of easy-to-use Photography Retouching apps available that offer similar features. PicMonkey is one of the most popular options, allowing users to edit photos from their camera or gallery, change the image quality and even perform advanced tasks such as background modification and shadow fixing.
Using Photoshop for Photo Editing
Photoshop is the most popular photo editing tool out there and it’s easy to see why. With its powerful features, it can be used to achieve a wide range of effects from simple enhancements to complex edits. For example, you can use Photoshop for retouching to adjust white balance, spot healing, and color correction. You can also use the program to add special effects like sharpening, cropping, and exposure correction. With the right tools, you can easily create stunning images with Photoshop.
Advanced Product Image Editing Techniques
Advanced product image editing techniques are highly essential to give a professional look to your product images. Spot healing, frequency adjustment, and color correction are some of the most common retouching techniques used. Photoshop is a great tool for photo editing, allowing you to adjust white balance, clarity and exposure. You can also use frequency adjustment to alter the skin tone in an image. Additionally, you can duplicate an image layer, sharpen your images and crop them. All these techniques will help you enhance your product images and give them a professional look.
Duplicate the Image Layer
Once you have the image open in Photoshop, you can start to make changes. One of the most important steps is to duplicate the image layer. This ensures that you can go back to the original image if needed. To duplicate the layer, simply press Command J on macOS or CTRL J on Windows. This will create a new layer with a duplicate of your original image. You can then make any adjustments to this new layer without affecting the original image. This is a great way to start any Photography Retouching project as it ensures that you can easily revert to the original image if needed.